
Importance of Seasoning Cast Iron
Think of seasoning as the non-stick layer on your cast iron that separates the metal from your food. Without this layer, created through a process called polymerization, food would get stuck to your pan and make cooking nearly impossible. Seasoning cast iron also protects the cast iron from rust.
For centuries, cast iron cookware including dutch ovens, frying pans and griddles have been passed down from generation to generation. If you do a good job seasoning and maintaining your cast iron cookware, you too can pass down cast iron as a family heirloom. For tips on maintaining cast iron, we’ve got you covered. Read our guide on what to do with your cast iron after every use as well as our checklist to keeping your cast iron well cared for while camping.
Setup and Supplies
You’ll need your cast iron cookware, a pre-heated oven, a foil-lined baking sheet, your preferred oil, a lint-free rag or good quality paper towels and oven mitts.
Naturally, your first question is “Well what oil should I use?”. Don’t sweat! Check out our blog on choosing the best oil for seasoning cast iron and what oil we recommend using.
Prior to seasoning, be sure to clean your cast iron using a small amount of soap and your preferred scrubbing tools to remove any residual oil, grease, food, dirt, ash, etc.. For many cast iron enthusiasts, this is a no no. However, we’ve gone to extensive lengths to research this very question. Click here to read our article on why dish soap is totally safe on cast iron.
Step-by-step: How to Season Cast Iron
Place a foil-lined baking sheet on the bottom rack of your oven. This will ensure any excess oil on your cast iron will not drip and stick to your oven. Your cast iron cookware will be going directly on the middle rack of your oven.
- Preheat the oven to 450°F/232°C
- Saturate a clean lint free rag with your Canola oil and thoroughly coat all surfaces of the cast iron.
- Place in the oven, directly on middle rack, face down. Be aware that seasoning cast iron might produce a little smoke.
- Let the cast iron remain in the oven for one hour or until you notice that the smoking has stopped.
- Carefully remove from the heat using oven mitts and allow to cool on top of stove or on a cooling rack until cooled enough to add more oil with the lint free rag.
- Repeat the process at least two to three times.
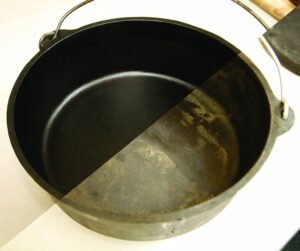
Once finished your cast iron should look slick, shiny and have a beautiful black patina throughout. Examine your cast iron for areas that don’t exhibit the black glasslike finish. If there are gaps in the finish, add more oil. You want the surface to be fully sealed. As your cast iron gets used, the seasoning will become more and more resilient.
How do you know if your cast iron is fully seasoned?
The easiest way to tell that your dutch oven is fully seasoned is by cooking! You know your cast iron is fully seasoned when food doesn’t stick to the cooking surface. If food is still sticking, we can help you diagnose the issue here. Generally there are two main reasons this might be happening: either you are cooking too hot or the cast iron isn’t fully seasoned.
Properly seasoned cast iron will have a completely non-stick surface. It will look very shiny and should be easy to clean. If your food is sticking, revisit the seasoning process and things should improve. Seasoning takes time, patience and persistence and a willingness to follow each step thoroughly.
Once seasoned, be sure to keep your newly seasoned cast iron clean and well maintained.
What if My Cast Iron is Not Pre-Seasoned or I’ve Stripped the Seasoning?
These days, the overwhelming majority of new cast iron come pre-seasoned from the manufacturer. In this case you might want to still check the seasoning and see if it has a nice black patina and there are no burrs or blemishes. You don’t HAVE to re-season, but we still recommend a few rounds of seasoning.
If your new cast iron is not pre-seasoned, the first thing you’ll notice is your cast iron will be coated with a thick layer of wax that was applied at the factory to ensure that you receive a rust free oven. Before you season cast iron, check for cracks or irregularities that might have occurred during casting. If you have a Dutch Oven, be sure to check the lid as well. If you find any burrs they will need to be removed by filing or sanding.
Once you’ve inspected your cast iron, it is ready to remove the shipping or storage wax. This is best done in the oven, using a foil lined cookie-sheet to catch the wax as it melts. Line a cookie sheet with foil and place it on the bottom rack of the oven. Set your oven to 350º. Place your cast iron in the oven face down on the middle rack. The hot wax drippings will land on the cookie sheet.
You’ll probably notice some smoke coming from the cast iron. This is expected. Once the smoking stops you’ll know that your cast iron is ready to be seasoned. Remove the kettle and lid from the oven and allow cooling a bit before you wash it thoroughly with soap and water. Once the oven is fully dried and slightly cooled you’re ready to start the seasoning process as outlined above.
What is the appropriate temperature to season cast iron?
Your cast iron must be heated above the smoke point of the oil you’re using to season your cast iron. It is beyond this smoke point where polymerization and the cast iron seasoning process occurs. Click here for more on choosing the best oil to season cast iron